

Microsoft operating systems and server applications are becoming increasingly dependent on proper time synchronization. A skewed system clock can affect your ability to log on, can cause problems with mail flow in Exchange, and be the source of a great many difficult-to-locate problems. To compound matters, the default method of handling time synchronization within a Windows network isn’t exactly reliable or even predictable. If a Hyper-V host’s clock becomes out of sync, it usually affects all of its virtual machines, sometimes catastrophically. Fortunately, it doesn’t take much work to get everything in sync.
PICK A COMPUTER TO SERVER AS THE AUTHORITATIVE INTERNAL TIME SOURCE
The first thing you want to do is decide what machine you want to serve as the authority of time within your domain. In most cases, I choose the domain controller that holds the PDC emulator role. According to Microsoft’s documentation, that’s supposed to be the highest authority on the matter anyway, although it doesn’t seem to work out that way in practice. The machine that you choose will be regularly consulting Internet sources, so if you’re in a high-security facility, you might consider delegating this role to a different computer. You could have multiple machines serving as authoritative time sources, but more than one per site generally is unnecessary. You could also have one machine pull external time and have your PDC emulator use that as its source while still serving as the authoritative server for the rest of the computers in your domain.
FIREWALL INFORMATION
Time synchronization traffic travels on UDP port 123. Your authoritative server will need that port open inbound. All clients, including the server, will need it open outbound, at least to the authoritative host’s IP.
CONFIGURE THE AUTHORITATIVE COMPUTER
You can use any computer or device that runs an NTP server. This post will only discuss how to set it up for a Windows Server computer. The steps are well-documented in Microsoft Knowledge Base entry (http://support.microsoft.com/kb/816042). Scroll down to the section titled “Configuring the Windows Time service to use an external time source”. Press Download to download a distribution and solve the issue automatically. I recommend you set all parameters manually via the “Manually configure the Windows Time service” section. Please, be careful while introducing changes in the registry.
In the 4c step I use the following:
0.pool.ntp.org,0x1 1.pool.ntp.org,0x1 2.pool.ntp.org,0x1 3.pool.ntp.org,0x1
Once you’ve done this, the changed computer will periodically “announce” that it is an authoritative time source. In reality, this “announcement” probably won’t be received by most of your domain computers.
CONFIGURE DHCP
If you’re using a Windows domain, I always recommend using Windows DHCP. Since you really only need a single source, it is easiest to set this as a server option, although you certainly could establish it on each individual scope as a scope option. Set options 004 and 042:
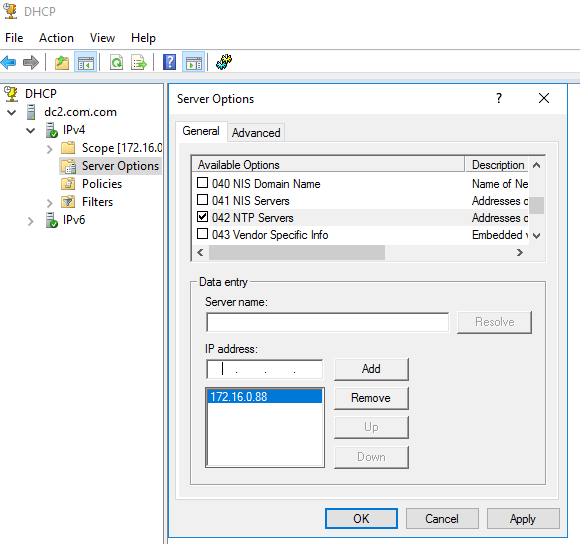
With DHCP entries, you can only use IP addresses. You can type the name of the server in and click “Resolve”, but it will always insert an IP address.
If you’re serving DHCP using a Cisco device, inside the configuration for the DHCP scope enter the following commands: “option 4 ip 172.16.0.88” and “option 42 ip 172.16.0.88“. Obviously, substitute your actual NTP server for the IPs in those commands. For other NTP servers, consult the manufacturer’s documentation.
Now, all DHCP devices will pick up the internal NTP server configuration at their next refresh. Unfortunately, a lot of Windows units won’t pay much attention to that, although most DHCP client devices will.
CONFIGURE STATIC DEVICES AND NON-WINDOWS COMPUTERS
Most devices, such as NAS and SAN equipment, have a place to enter NTP server information. For most Cisco IOS devices, enter “ntp server 172.16.0.88” at a config prompt. For non-Windows computers, consult the operating system’s documentation. In general, this type of equipment won’t be as concerned with the accuracy of its clock as Windows computers, so you may opt to skip this.
DETERMINE HOW YOU WISH TO HANDLE VIRTUALIZED GUESTS
All modern hypervisors have the ability to provide time synchronization to guest machines through that hypervisor’s integration tools. If enabled, guest machines will draw time from the physical host they are running on. In most cases, you’ll want to disable this feature for Windows Server guest machines that are serving as domain controllers. For all other guests, it’s a judgment call. I have personally not encountered problems using time synchronization, provided that the host’s clock was properly maintained, but other administrators have found it necessary to disable synchronization. However you choose to handle this, the important thing is to ensure that you are consistent.
For a Hyper-V guest, open its Settings dialog box and open the “Integration Services” tab. Clear or set the checkbox for Time Synchronization as desired. For other hypervisors, consult the manufacturer’s documentation.
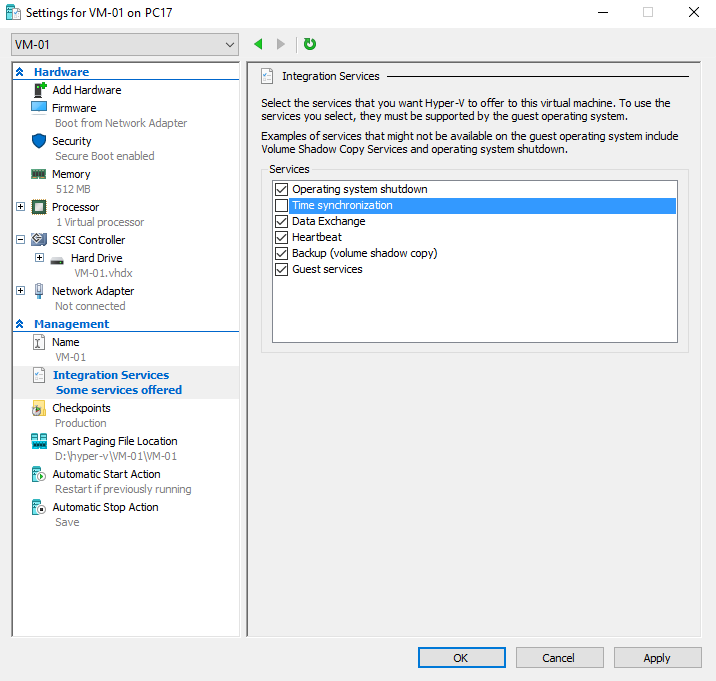
For virtualized domain controllers, especially on Hyper-V Server 2016 and later, you must disable the Time Synchronization service. While you will find references to partially disabling the service, it is no longer effective.
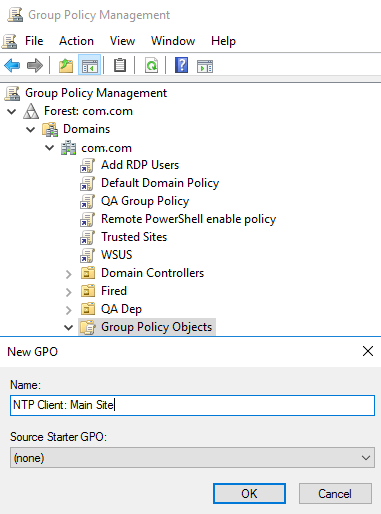
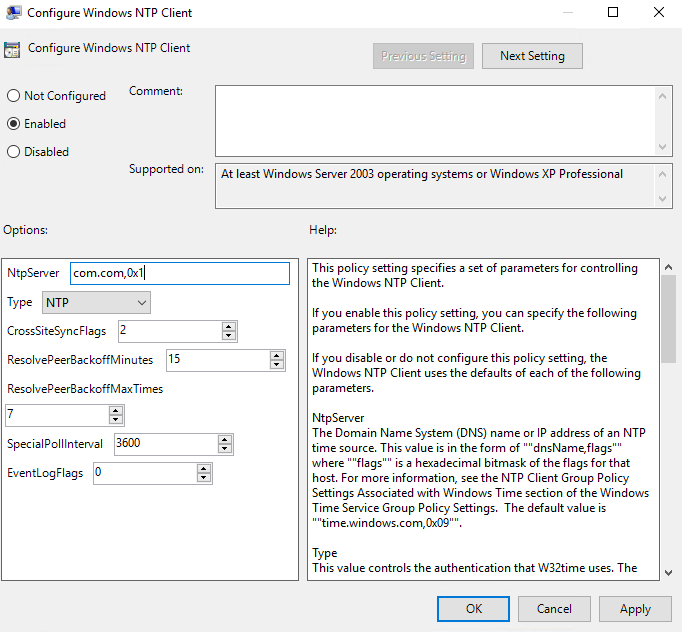
Right-click on your newly created GPO and click “Edit”. This will launch a new window with the group policy editor. Navigate to Computer Configuration->Policies->Administrative Templates->System->Windows Time Service->Time Providers. In the right pane, double-click “Enable Windows NTP Client”. Set it to “Enabled” and click OK. Next, double-click “Configure Windows NTP Client”. Configure the options similar to the following image.
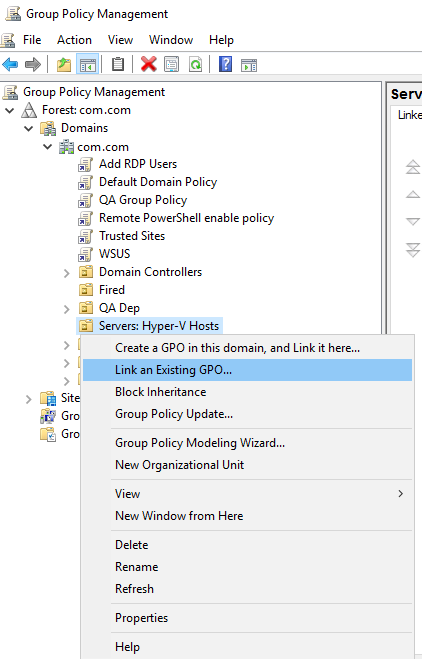
After saving this GPO, close the policy editor. This will return you to the main group policy management console window. If your domain has a large number of policies, right-click on the new policy and navigate to GPO Status->User Configuration Settings Disabled. This will speed up policy processing a tiny bit. Now, right-click on an OU that you want to apply this policy to and click “Link an Existing GPO”. Highlight your new policy and click OK. Repeat for other OUs as necessary. Remember that a nested OU will inherit from its parent unless inheritance is blocked or unless it has its own linked GPO with conflicting settings. These are general guidelines; a complete discussion of GPO inheritance and application rules is beyond the scope of this post.
OTHER DOMAIN CONTROLLERS
In general, domain controllers behave better than most other Windows computers just by using the default settings. However, they can misbehave as well. If you’ve gone through the steps above to properly set your domain clients, it’s unlikely to be as problematic as it could be otherwise, since you’ve all but guaranteed that the other Windows computers in your domain will be working with an authoritative time server. Because of all that, you could just leave the other domain controllers alone. If you wish to ensure that they are correct, the best thing to do is use the local group policy edit. Go to Start and Run and enter “gpedit.msc” at the prompt and click OK. Then just use the same settings as you would have in the domain group policy editor. If the domain controller you want to operate on is running Server Core, you can perform this remotely if its firewall permits. Just run “mmc.exe” on a GUI computer, go to File->Add/Remove Snap-In, double-click “Group Policy Object Editor”, browse to the computer you want to work on, and once you’ve acknowledged all the dialogs you’ll be modifying the group policy on that computer.
CHECK YOUR WORK
If the group policy change was made recently, your computer may not yet have received it. At an elevated command prompt, run “gpupdate”. At an elevated command prompt, enter “w32tm /query /source”. On the authoritative server, this should return one of the time servers you entered in the Peers registry key. For a domain computer, it should list the authoritative domain server you specified. For a Hyper-V virtual machine with time synchronization enabled, you should see: “VM IC Time Synchronization Provider”. If the setting is the local CMOS clock, your setting did not work.
